5 years ago4908 Views968 Down13 Likes1 !
 Bomb
Bomb
Nothing says STAY OUT quite like a good old-fashioned hidden bomb.

Nothing says STAY OUT quite like a good old-fashioned hidden bomb.
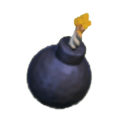
Level 1_2
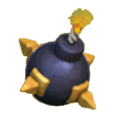
Level 3_4

Level 5_6

Level 7_8

Level 9
Stats
| damage radius | size on board | damage type | trigger radius | unit type targeted |
|---|
| 3 tiles | 1x1 | Area Splash | 1.5 tiles | Ground |
Levels
| Level | damage | build cost | build time | experience gained | town hall level required |
|---|---|---|---|---|---|
| 1 | 20 | 400 | N/A | 0 | 3 |
| 2 | 24 | 1,000 | 15m | 30 | 3 |
| 3 | 29 | 10,000 | 2h | 84 | 5 |
| 4 | 35 | 100,000 | 8h | 169 | 7 |
| 5 | 42 | 1,000,000 | 1d | 293 | 8 |
| 6 | 54 | 1,500,000 | 2d | 415 | 9 |
| 7 | 72 | 2,000,000 | 3d | 509 | 10 |
| 8 | 92 | 2,500,000 | 4d | 587 | 11 |
| 9 | 112 | 4,000,000 | 6d | 720 | 13 |
Wallpapers of Bomb
5 years ago2017 Views116 Down1 Likes0 !
5 years ago2031 Views87 Down1 Likes0 !
SUMMARY
- Bombs are inexpensive traps that remain hidden until they are activated by an attacking troop moving into their trigger radius.
- Once triggered, Bombs must be re-armed, for a small fee, in order to trigger again during an enemy raid. For example, if one's village successfully defends against an attack, but several Bombs are triggered, then any attacks after that will not have to deal with those Bombs until they are re-armed.
- Although they are the weakest of all the Traps, Bombs can still have a positive impact on the effectiveness of a village's defense if properly placed. But only if they are always re-armed after triggering.
- Even though Bombs are classified as "Defensive Buildings", they are not buildings and do not need to be triggered/destroyed for your enemy to reach 100% destruction (nor do they count toward it).
- The Bomb explodes approximately 1.5 seconds after an enemy comes within 1 tile of it, causing splash damage to every enemy ground troop within 3 tiles. This delay means that you'll want to place the Bomb in an area where troops are likely to remain for a period of time, like right next to a building they're attacking.
- By itself, a single Bomb will not do a great deal of damage to even the weakest of Troops (although every bit helps). However, several Bombs in a cluster can significantly damage or even destroy an entire group of Archers or Goblins.
OFFENSIVE STRATEGY
- Bombs do only slight damage to high health troops but will destroy small troops. Try using tanks or high health troops like a Giant to absorb the bomb.
- If you suspect that a particular location has Bombs in it, use a small troop, such as a Barbarian to trigger them. Do not send small troops en masse, or they may all be heavily damaged at best, or completely wiped out at worst.
- Air troops like Minions do not have to worry about Bombs as the Bombs cannot damage them.
DEFENSIVE STRATEGY
- A Bomb will destroy an equivalent-level wall breaker at all levels. Since wall breaker A.I. targets wall junctions, place Bombs at outside perimeter intersections and corners for maximum effect.
- One defensive strategy commonly used for the placement of Bombs is to position them along the outside wall, behind external buildings. The external buildings serve to delay the enemy troops until they've grouped up, so that when they attack the wall, the Bomb hits many troops at once. This is most effective against low-health troops, though grouping enough Bombs together can be a serious hazard for Giants, too.
- Alternatively, some players decide to place a group of Bombs around a Defensive building on the outside of their base, to act as a trap for enemy Giants. Placing a Spring Trap at the entrance to these trapped defense structures makes them even more effective.
- Be cautious when upgrading a Bomb, as this will reveal its location. Combat this by relocating it during the upgrade period, since it won't trigger during that period anyway. This is useful against players who scout out your base ahead of time for revenge attacks.
- Exploiting the way the A.I. targets buildings can dramatically increase the defensive effectiveness of your Bombs. For example, a group of 2-3 Bombs placed between a pair of resource collectors is very likely to destroy an entire group of Goblins as they pass from one collector to the next.
UPGRADE DIFFERENCES
- At level 3, the Bomb becomes a little bigger and gains 4 golden spikes around its circumference.
- At level 5, the Bomb is encased in two metal shells that have several golden bumps on their surface.
- At level 7, the Bomb is encased in two golden shells with no bumps on surface.
TRIVIA
- After exploding, the Bomb leaves a black scorched mark on the ground, and it fades away after a few seconds. Unarmed
- The fuse on the Bomb is lit constantly, but it never burns up.
- If you light a Bomb just before the battle ends, the Bomb never explodes.
- After the December 17, 2015 update a maxed out Bomb can instantly kill a group of summoned skeletons making bombs really effective against Witch based attacks.
Icon Des
| | Tapping this icon displays information about the Bomb, such as Level, Re-arm cost, Damage Type and Targets. |
| | Tapping this icon begins upgrading the Bomb to the next level, if you have enough resources and a free Builder. When the Bomb is at maximum level, this icon is not shown. |
| | Tapping this icon instantly upgrades the Bomb to the next level, at the cost of one Hammer of Building if you have one. When the Bomb is at maximum level, this icon is not shown. |
| | Tapping this icon, which is displayed only while an upgrade is in progress, instantly finishes that upgrade at the cost of the displayed number of Gems. |
| | Tapping this icon, which is displayed only while an upgrade is in progress, instantly finishes that upgrade at the cost of one Book of Building. This icon is only shown if you have at least one Book of Building. |
| | Tapping this icon, which is displayed only while an upgrade is in progress, instantly finishes that upgrade at the cost of one Book of Everything. This icon is only shown if you have at least one Book of Everything but do not have a Book of Building. |
| | Tapping this icon, which is displayed only while an upgrade is in progress, boosts all your Builders for 1 hour by a factor of ten, at the cost of one Builder Potion. This icon is only shown if you have at least one Builder Potion. |
| | Tapping this icon, which is displayed only while an upgrade is in progress, cancels the current upgrade and refunds half of the upgrade cost. |
| | Tapping this icon re-arms this Bomb. This icon is only displayed after this Bomb has been triggered during an enemy attack. |
| | Tapping this icon re-arms all Traps. This icon is only displayed when one or more of your Traps have been triggered in a previous enemy attack. |
| | This icon informs you that all Traps are armed. It is not tappable, and replaces the re-arm icons. |
All Units
| ARMY | • Builder Barracks • Star Laboratory • Battle Machine Altar • Army Camp |
| DEFENSE | • Double Cannon • Crusher • Archer Tower • Roaster • Guard Post • Cannon • Giant Cannon • Firecrackers • Multi Mortar • Hidden Tesla • Wall • Air Bombs • Mega Tesla • Lava Launcher |
| HEROES | • Battle Machine |
| RESOURCES | • Gold Mine • Gold Storage • Builder Hall • Elixir Storage • Elixir Collector • Clock Tower • Gem Mine |
| TRAPS | • Push Trap • Mega Mine • Mine • Spring Trap |
| TROOPS | • Baby Dragon • Raged Barbarian • Bomber • Night Witch/Bat • Sneaky Archer • Drop Ship • Beta Minion • Night Witch • Boxer Giant • Super P.E.K.K.A • Cannon Cart • Drop Ship/Skeleton • Hog Glider |
| BOOKS | • Book of Fighting • Book of Everything • Book of Building • Book of Heroes • Book of Spells |
| POTIONS | • Builder Potion • Power Potion • Clock Tower Potion • Training Potion • Resource Potion |
| RUNES | • Rune of Dark Elixir • Rune of Builder Gold • Rune of Elixir • Rune of Gold • Rune of Builder Elixir |
| RINGS | • Wall Ring |
| HAMMERS | • Hammer of Fighting • Hammer of Building • Hammer of Heroes • Hammer of Spells |
| SPELLS | • Santa's Surprise • Birthday Boom |
| TRAPS | • Freeze Trap • Shrink Trap • Santa Strike • Pumpkin Bomb |
| TROOPS | • Pumpkin Barbarian • Giant Skeleton • Battle Ram • El Primo • Ice Wizard • Skeleton Barrel |


